Building Option Sets
Building Option sets on your site.
1. To view your option sets, once logged in through your admin account, hover over “Store” -> “Products” -> and click “Option Sets”. If you do not see this option, that means the feature is not yet set up on your site. If this is the case, please contact one of our team members.
2. At this point you will be taken to a list of your current option sets. This list may be blank at first, or it may have a test option set which you can simply ignore. To create a new option set, click on “+ Add commerce option set”.
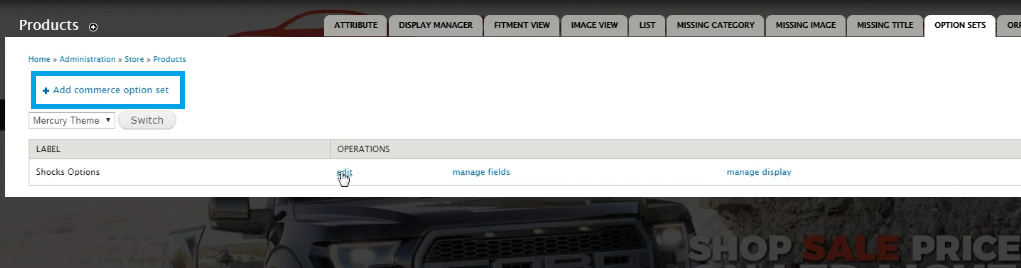
a. You can create multiple option sets. For example: shock options, bumper options, pricing options, etc. These option sets are the ‘parents’ to the actual options.
3. On the next screen you’ll be able to specify the option set title. You can simply name it and save.
4. Fields are the option fields themselves. So after you create the parent set. You will be able to add the options in the “Manage Fields” tab at the top right of the page.
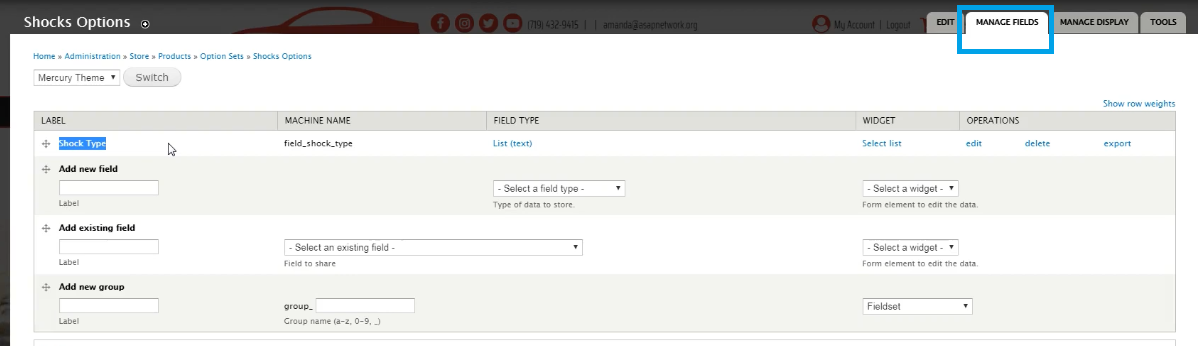
5. Understanding this page:
a. The first column for the field label will be the title users will see for this specific option.
b. The second column for the field type will almost always be a “List (text)” that you will need. This one will allow you to create the options the user can choose from. (if you offer custom embroidery for interior kits for example, you can use a field type of “Text” for just a text box)
c. The widget choice in the third column gives you two options for the list field type. A select list will create a dropdown list, or if you switch to checkboxes/radio buttons it will list them all out. The latter option can get long on the front end product page if you have several choices.
d. After setting these 3 columns for your option click save at the bottom.
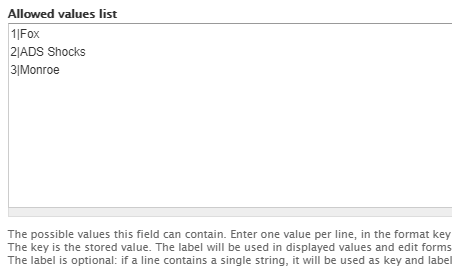
6. The following screen will ask you to specify a bit more. Under “Field Settings” Is where you list the actual options that would be in the select list or check boxes for the user to choose from. You will need to enter one value per line, in the format “key|label” like in the image below:
7. After clicking save on this page, it will ask you to verify the information so far. On the following page, you’ll see a checkbox under the label so you can specify if this option is required with the product.
8. Towards the bottom of this page it will ask you to verify the field settings in case there were any errors. You will also notice an option for the number of values. If this is a type of option where they can select multiple values, you can change this to unlimited, or however many is the max for the product. If you switch this option from 1 to more, we recommend changing the widget type to check boxes/radio buttons. After verifying this info, click save at the bottom of the page.
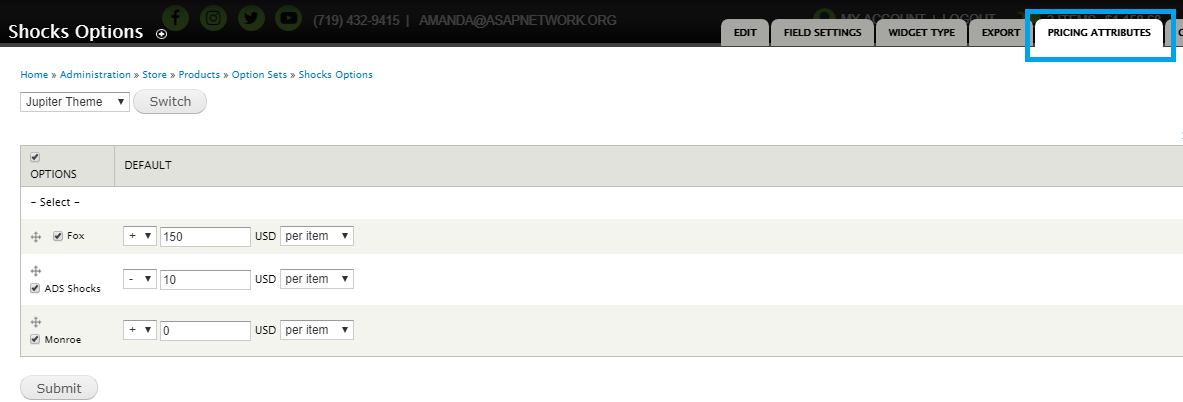
9. If you have pricing changes associated with the options, those are specified under the “Pricing Attributes” tab. There you will have a row for each item you entered under the field settings. You have the option to: include or exclude any of them, increase or decrease the pricing, specify the amount to increase or decrease by, and choose if you want that change applied per item or per order.
10. Do not forget to save any changes or additions you wish to keep. Once your option set is complete, you can choose to include it in a product.
11. To add the option set to a product, find the product variation either from the front end by clicking edit on the product page then edit for the variation, or going through the admin menu by hovering over “Store” -> “Products” -> “All product variations”. There you can search for the product in the searchbar by the sku or title, then clicking edit.
a. In the variation settings for the product there will be a section for “Options” where you can choose the parent set in a dropdown list. There you’ll see the suboptions for the set as well.
b. Do not forget to save at the bottom of the page.
c. If you decide you do not want this option for the product later on, you’re able to go back in these settings for the product variation and simply uncheck the set selection.