Changes and edits to your content
Here we go over how to make changes to your general content outside of products on your site. So Basic pages like your about, content, privacy, etc; also your articles, blog, events, builds, etc.
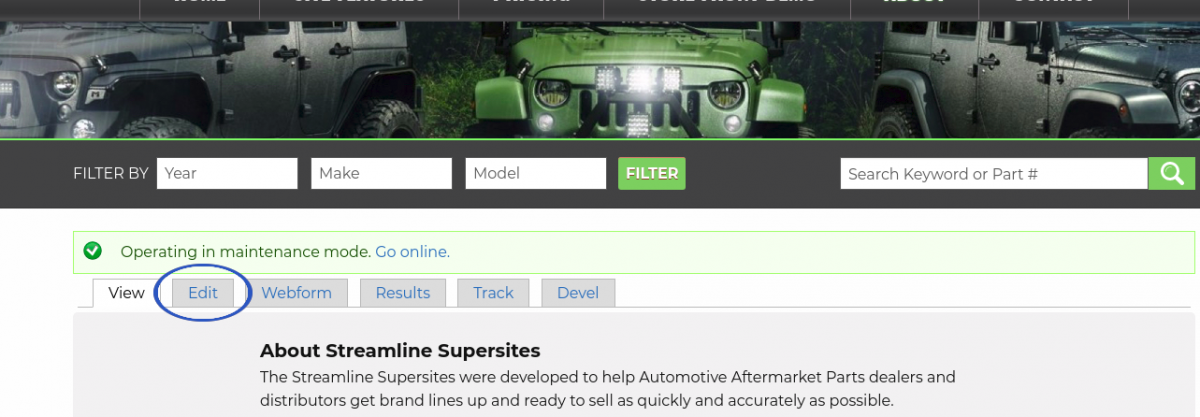
1. There are two ways to get to the edit page on any of your content pages. The first way is to go to the page itself, and click the “Edit” tab at the top of the content.
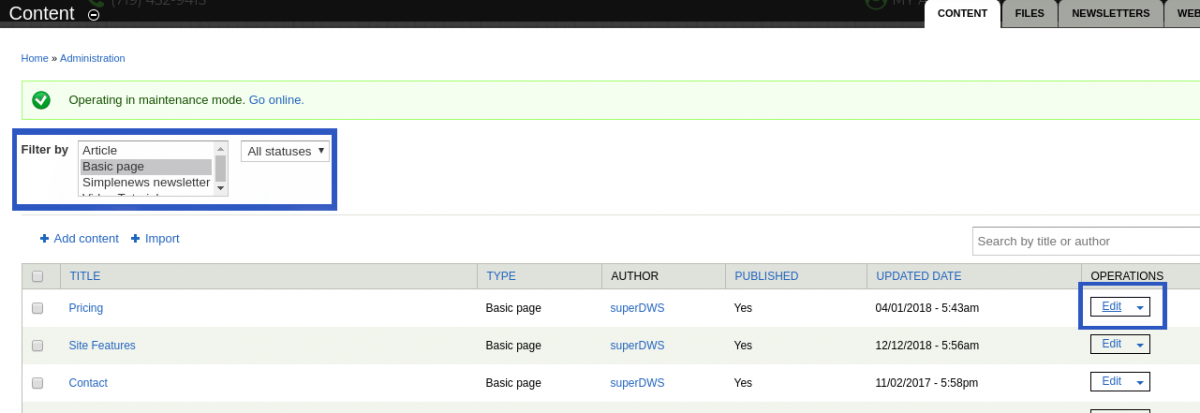
2. The second way is to go through your admin menu and first clicking on “Content”. On the following page it will list all the content on your site except for product displays (again this has its own page on the site which is detailed in several ways in our “Working With Products & Data” section on the tutorials page).
3. On the following page, you’ll notice several columns. If you click on the title of each column you can sort by them. You’ll notice the published columnas well where you can in a way deactivate a page if you would rather not delete it.
4 .You can use the filter at the top left to filter by content type if you have several pages to look through. When you find the page/content you need to edit simply click “Edit” to the right.
5. In the edit page, depending on the content type you will see different fields. For example, if you are editing an article, you will see an image field, and in a basic page like a contact page unless you have custom fields specified during site development you will not have an image field.
6 .Here you can make any changes needed. You’ll notice in the body of the page it will have a toolbar above the text area similar to Word. You can make different customizations here.
a. If you want to add a link, highlight the text or word you want to link, then find the icon in the toolbar that looks like a chain-link. When you hover over the icon it will say “Link”, click on that. In the following pop up you can do a few things.
i .If you’re linking to an email, change the link type to “Email” and you’ll see more options appear. Enter the email you want that piece of text linked to in the “Email address” field.
ii .If you’re linking a phone number, keep the link type on URL. In the URL field, type in the 10 digit phone number with a “tel:” prefix in this format: tel:17025551234.
iii. If you’re linking to another page on your site, leave everything on default and just paste the link to that page.
b. If you want to add an image in the body, simply move the cursor in the body where you want the image, and click on the image icon in the toolbar. Follow the upload path in the pop up, leave all settings on default and you’re set.
7. Near the bottom of the page you’ll notice a gray area with tabs to the left such a “Menu Settings”, “XML sitemap”, etc. All of these tabs are preset for you, so no need to change anything in them. The only one of these tabs you should be familiar with is the “Publishing Options” tab. If for any reason you want to remove this page from your users viewing, you can simply uncheck the “Published” box in this tab. This will not delete the page, but only unpublish it so you can still view and make changes and bring it back by checking “Published” when you’re ready. A good example of when this comes in handy is for holidays. If you have a nice promo page for Christmas or Halloween, you can simply unpublish until it’s time.
8. When you’re finished making any changes, don’t forget to scroll to the bottom of the page and click save.