Processing Orders
Here we go over how to view your pending orders and process them officially. This is also where you can add tracking numbers, and this tutorial also covers how to add new carriers if they aren’t already listed for you.
1. When an order is made on your site, you will get an e-mail notification. That order is pending until you process it.
2. To view your orders, log in to your site and in your admin menu at the top of the page go to “Store” -> “Orders”. This will bring you to a page that looks like this:
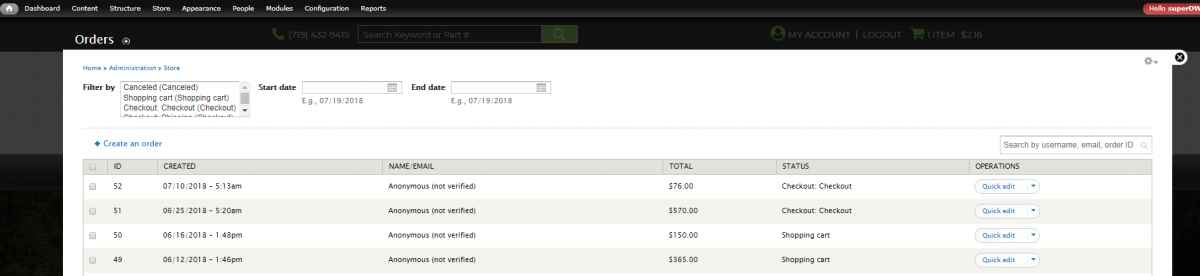
3. This page will show you all orders that are in every stage. You can see the stage the order is in via the fourth “STATUS” column. To just see orders that need to be processed, you can narrow it down with the “Filter by” box in the upper left area of the page. Scroll through the filters and select “Pending (Pending)”. This will narrow down all your orders to just show the ones that need to be processed.
4. From here, you can click on the “Quick edit” option in the last column for that pending order, and the screen will look like this:
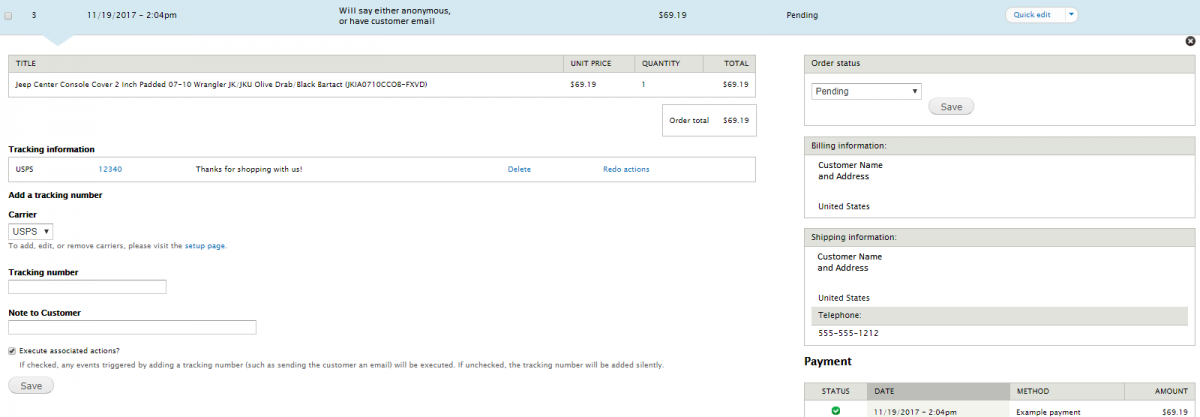
5. From here you can see the items ordered, the customer information, payment information, and even add a tracking number for the order. To the right under “Order status” is where you can change the order status. If you notice the order has an item you need to double check the stock of, need to contact the manufacturer, are interrupted by a phone call, or any other reason you are not yet ready to process the order fully, you can change this status to “Processing” and save it.
a. If you don’t see the carrier you are using for the order, you will need to add the carrier. It’s a quick process, just go through your admin menu through “Store” -> “Configuration” -> “Simple package tracking”. This will bring you to a screen that looks like this:
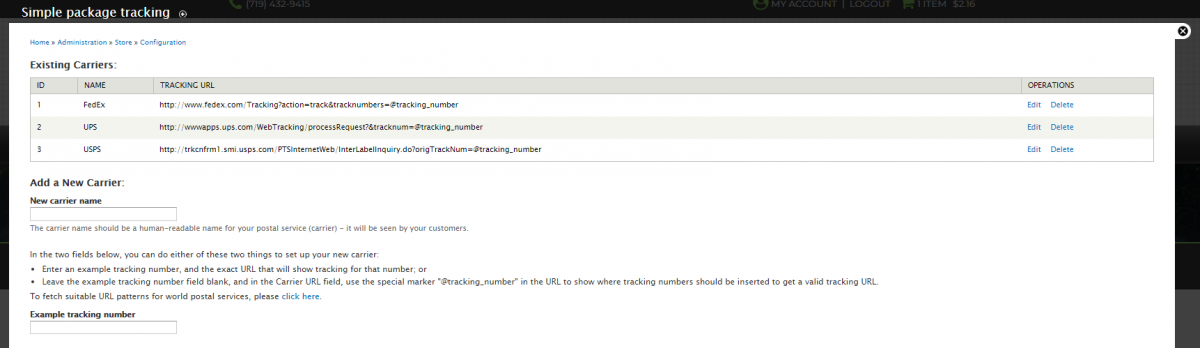
To add a new carrier, simply type the new carrier name in the designated area, then after the bullet list where it says, “To fetch suitable URL patterns for world postal services, please click here.”, follow that link, find your carrier, and click select to the far right of that carrier, then save!
This is also where you can setup default text for your tracking notes to the customers. This can only be a sentence long, a quick note. This area is not meant for long text, mostly a simple thank you message for your users.
6. When you’re ready to process the order, select “Completed” and save in that order status section. When the order is completed, the customer will receive a notification e-mail. Therefore, it’s imperative not to mark the order as complete during an interruption to the order processing, as mentioned in the previous step.
7. Once an order is marked as completed, it will then show up on your sales report. The report can be viewed through “Store” in the admin menu, “Reports” -> “Sales”. There is another instruction set for the sales reports as well.
8. The customer can then view their invoice when they’re logged in on the site by going to “My Account” usually at the top right corner of the page while logged in, then they will see a tab titled “Order history”. From there they can click “View order” for the order they want to see, and it will give them the option to simply view it or view a “Printable Invoice”.