Removing A Brand From Your Rapidfire Site
Here we cover how you can properly remove a full brand from your Rapidfire site along with all its products. (If your site is not a Rapidfire site, please use the other set of brand removal instructions: Removing A Brand From Your Site)
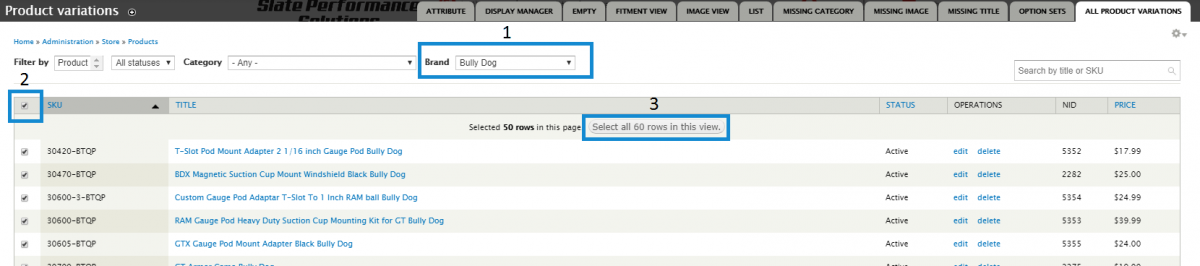
1. The first thing you will need to do before removing the “brand name” directly is to remove the products of that brand. In your admin menu, hover and go through “Store” -> “Products” -> “All Product Variations”. This will show you all the products on your site.
a. At this point, use ONLY the Brand filter at the top of the page to filter by the Brand you are looking to remove.
b. Select all the products on that page by checking the box at the top left corner of the list. This will select only that page, which only shows 50 items at a time. To select the rest of that brand, click on “Select all 60 rows in this view” which will show up when the top left checkbox is checked.
c. At this point, each product of that brand will be selected. Now scroll to the bottom of the page, and under “Bulk operations” select “Delete Product Variation” and click Apply.

d. The next page will ask you to confirm the action. At the top will say “You have selected X items:”, and the very last item will list the rest of the amount not included in the list displaye Simply click Confirm.
e. Depending on your system and your internet, it may delete a chunk but leave big portion still in ther If that happens, just run it again until you see they are all gone, or there might be a 3 or 4 items that remain or simply won’t delete. Those few items cannot be deleted because they are connected to an order. So if they are in someone’s shopping cart, or if they have been ordered in the past they can’t be deleted.
i. If you have the few products that will not be deleted, you can either disable those, or simply get rid of that display along with the empty ones covered in the next step. To disable them, simply edit the product and change the status to “Disabled”, then save at the bottom.
2. The next step will be to delete the empty displays. If you remember from previous tutorials, the product display is the front-end wrapper for each product. To get to all the empty displays, you can either go through your admin menu again by following “Store” -> “Products” -> and depending on your site it will either be titled “Empty” or “Empty Displays”. The second way to get there is if you are still on your product variations page, navigate to the empty displays tab.

a. At this point you’ll simply delete everything listed, same as in step 1 Click on the checkbox to the top left corner, change the bulk operation at the bottom of the page to “Delete product”, and click “Apply”.
b. The next page will ask you to confirm this action, click “Confirm”.
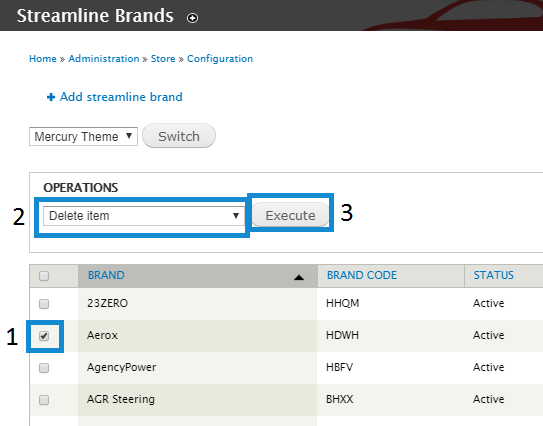
3. The next step is to remove the brand from your Streamline Brands list to make sure it does not auto-import itself back onto your site. In your admin menu go through “Store” -> “Configuration” -> “Streamline Brands”.
a. Now find the brand which you have just deleted all product variations and displays for, and select it by clicking the box to the left of the brand name.
b. At the top of the page under “Operations” choose “Delete item”, and click Execute.
c. You’ll now get a confirmation page to delete the brand, simply confirm. This will remove the brand from your site for now. When you’re ready to bring it back in the future, by following our “Loading Brands from ASAP” tutorials you’ll notice that brand will be in your list of approved brands.
4. At this point, it is recommended to delete the brand from its taxonomy. If there are no products on your site for a brand, that brand will not show up on the products page as a filter, but this will help keep your ecommerce site neat. If you do not plan on bringing the brand back eventually, you can delete it from there by going through “Structure” -> “Taxonomy” -> “Brand”. Edit the brand you just deleted products for, and scroll to the bottom to click “Delete”.