Step 2 – Mapping your Data
At this point, we are assuming that you’ve already prepared your data sheet and checked for missing fields. This tutorial goes over mapping, tampering, and importing.
1. After logging on to your Drupal site, in the admin menu go to “Structure” -> “Feeds importers”. If this is a new importer, select “Add importer”. You can then name your importer and add a short description as a reference for yourself, then click “Create”.
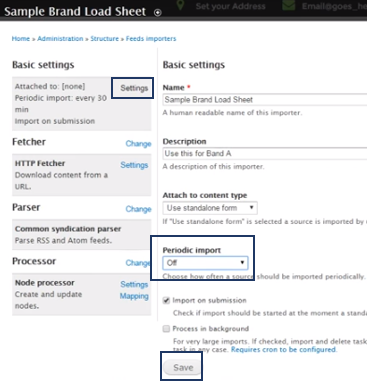
2. Under Basic settings, click on” Settings” and change the “Periodic import” setting to off. By default, it’s going to be set to every 30 minutes. Since you’re importing products, and not asking for things like weather updates which need a constant feed, you’ll simply switch this off. Then click Save.
3. Now click on “Change” next to Fetcher. You’ll want to switch from HTTP to a file upload. Select the File Upload and click “Save".

4. Now, click on “Change” next to Parser. Since we use a CSV, select on CSV and click Save.
5. Then go to “Change” next to Processor. Select “Commerce Product processor” and Save.
6. Now next to the Commerce Product processor, click on “Settings”. Most of the options already have explanations, but below is another breakdown for some more clarification. Read through the below clarification for at least the first few times you’re doing this.
a. Set the Bundle to Product.
b. If you are loading the parts for the first time, then under “Insert new commerce products” you’ll want to select “Insert new commerce products”, otherwise select “Do not insert new commerce products”. The latter is used if you need to go back and import videos or images or simply updating any existing products.
c. Under “Update existing commerce products”, select the first option, “Do not update…”, if you are updating for the first time. The last, “Update existing…”, if you only want to update any changes for products. “Replace existing…” is to replace existing products information. Replacing could be dangerous by wiping part numbers for items you don’t want to get rid of in the first place.
d. “Skip hash check” is kind of personal preference. If it is selected, it forces an updated of all items, even unchanged ones.
e. Under Text format, “Full HTML” is highly recommended. This will make sure to keep the formatting neat and matched with what’s already set up. Full HTML will ensure that you have the title in bold, bullet lists in the descriptions, etcetera. Any other selection will lose all formatting.
f. The next field “Action to take when…”, leave it on the default, “Skip non-exist…”.
g. Product type is left at product.
h. Under Author, this is a permission for whoever you would like to have permission to import this. If it’s only you, then start typing your username, and select it when it loads in the dropdown.
i. Tax Rate is left at None.
j. Save! :)
7. Select “Mapping” next to the same Commerce Product processor. You should now be at this page:
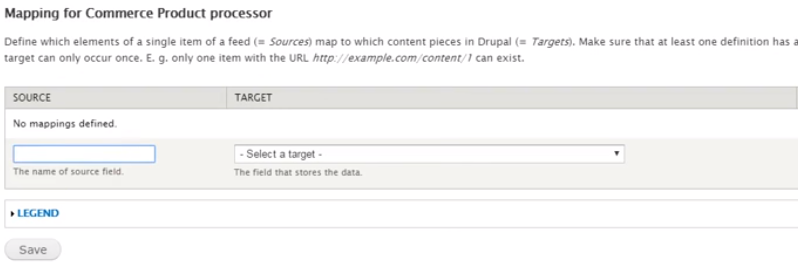
a. That first “Source” column is referring to the column name in your spreadsheet. The second “Target” column is referring to the field name on your site that the source column will map to. You’ll now have to go one by one and add each column. It does not matter what order the columns are in, as long as anything you need imported onto your site is correctly mapped.
b. Remember, that whatever you type in the source column has to match EXACTLY to what is on the spreadsheet. If the column name in the spreadsheet is in all caps, then you have to type in all caps. For safe measure, we recommend copying the column title from the spreadsheet and pasting it into the source field. Make sure there is no ending space after pasting. If there is (like in the photo below), then delete that space:

c. Once you have the source specified, pick the target. This part is pretty cool. No matter what the source name is, as long as the entries on the data sheet are compatible with the target, everything is fine. For example, if the data sheet has one of the source columns as “magical_numbers”, as long as you’re sure all the items in the column are actual skus, or whatever they’re meant to be (which the previous Step 1 prep tutorial helps you sort all this out), you can match it to the corresponding target, like so:

Don’t forget to save!
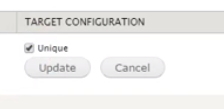
d. After you click save, you’ll then see a gear show up under the third column on this page after “Target”, called “Target Configuration”. This setting is for fields that need to be unique. So for something like a sku, you’ll want to click on that gear for the item, and check the Unique box, then click “Update”. This will keep the importer from duplicating parts and causing all sorts of a mess on your site. Remember to click save.
e. Please note: If you do not see a target field to map your source to, or if you plan on adding any filters that do not have a target field already created. There is another tutorial on creating product fields on your site called “Creating a New Product Field”. For example, if you would like to add a vehicle type, color, or any other product filter for your users that has not been created already, you will need to make a field for it.
f. Important fields to note:
i. For the price of your product. Make sure whatever the source is called, that it gets matched to “Price: Amount (commerce_price_amount)”. The other price fields have their own offset rules. So for example, “Price: Currency” will auto-turn your price into US dollars, which messes things up if you’re selling to a customer who lives in Canada. Make sure to stick with the commerce_price_amount.
ii. Images: There are several image options, but for the actual image itself you’ll want to stick to “Image: URI (field_image_uri)”.
iii. Under any taxonomy field such as category or brands, after you save the source/target specs, they will be labeled as “Term name” under target configuration. You will want to click the gear under “Target Configuration” the same way you have to when specifying a unique sku, and make sure the dropdown is on Term Name, and Auto create is checked, then click update.

This is going to make sure that for example, “Bumper” items in you data sheet are labeled as “Bumper” in that taxonomy term under the Categories taxonomy. If there is a term that isn’t in your category taxonomy already, it will create that term. This is one of the reasons prepping your data sheet is so important. If you recall from the Prepping tutorial, you want to make sure you do not have a “Spark Plugs” category in your sheet, if the correct category on your site is “Spark Plug”. The previous tutorial shows you how to filter through and remove that extra “s” if that is the case, so you don’t have duplicate categories created.
1. If you’re not yet familiar with the idea of a taxonomy, a taxonomy is: words grouped together under a larger parent word. So for example, if the parent term is fruit, the terms grouped under it could be apples, oranges, bananas, etc. They can even go further, and say apple is a term under fruits, but apple itself can be a parent term for words under its tree such as yellow apples, green apples, etc.
g. Do not forget to click save after every source field that you map to a target. Don’t be discouraged if you have up to 90 fields to map or more. That is perfectly normal. Also, remember that only fields mapped in this area will be imported on your site. So you want to make sure you don’t accidently lose any by something as silly as forgetting to save. :)
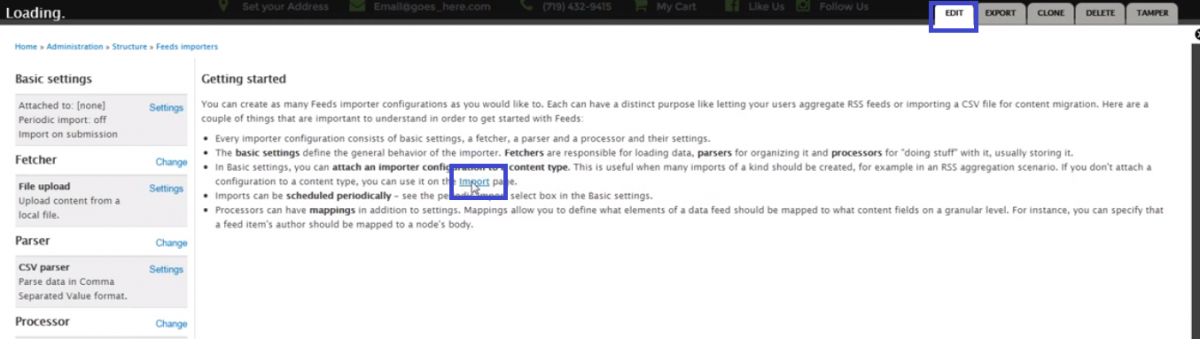
8. After you’ve finished mapping all your fields, you’ll want to click on the “TAMPER” tab in the upper right corner of your screen. This will bring you to a page that lists all the fields you just mapped.
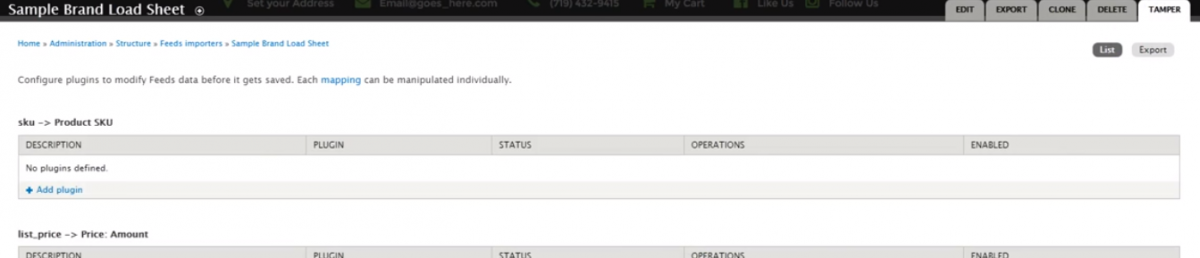
9. Fields to take note of:
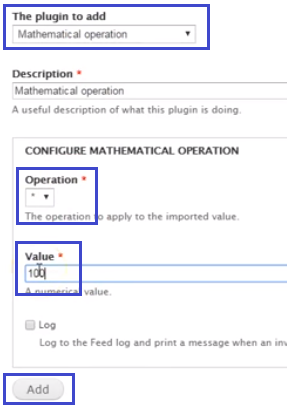
a. Pricing: Drupal looks at your price as pennies. So you will need to add 2 plugins to the tamper on the pricing. Click on “+ Add plugin” under the pricing field description. The first plugin you’ll add will be “Mathematical operation”. In the configuration, the Operation will be the multiplication sign “*”, and the Value will be “100”, then click add at the bottom. This will take those pennies, and turn them into dollars.
It will then take you back to the original tamper page from step 8 where you’ll see the new plugin listed under the price field. Now click on “+ Add plugin” again, and the next plugin will be “Cast to integer”. There are no further options for this one, simply click “Add”.
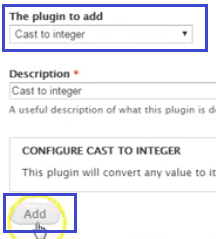
You’ll need to do this every single time on your pricing field.
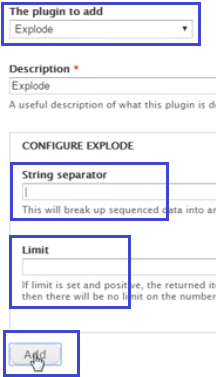
b. The following explode plugin is a requirement for the category field, and for any other fields that you’ll have multiple items on, like for images, videos, fitment, etc., you’ll need to add a plugin for those. Click on the “+ Add plugin” option under that field. The plugin to add will be ”Explode”. If your data is coming from ASAP, the String separator will be the pipe symbol. The pipe “|” symbol can be found by pressing shift, then the key above your enter key (on some Mac keyboards it’s found to the left of the return key). Some non ASAP brands are separated by commas, you can always check your data sheet. You can also choose to limit the amount of entries if you need to. You can leave that blank though if you have no limit restrictions.
10. One thing we recommend at this point before starting the import process is backing up your site. If after backing up your site you’ve imported less items than you had in your data sheet, that can cause a lot of issues. It’s much MUCH easier to restart the prepping and mapping process if the end result doesn’t add up, than to get it wrong and cause all sorts of issues. If you backup your site, you’ll be able to restore it and start from where you left off at finding the issue.
11. After you’re finished with your tampering, click save at the bottom of the page just to be on the safe side, then click on the “EDIT” tab at the top right of the page, then “import".
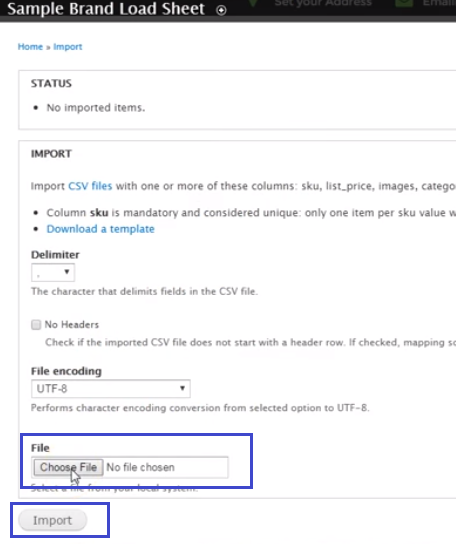
This will take you to the import page. Click the link for whichever import you just set up and are ready to import.

12. On the following page you’ll have to choose the data sheet file that you’ve prepared, and click on “Import” at the bottom.
13. It make take a long while, depending on how many items you’re importing, but when it’s finished it will tell you how many items have been imported. A good idea would be to double check that all your items were indeed imported. You can do this by checking how many lines you have in your data sheet, and making sure it matches how many items were imported. So if you have 400 lines in your data sheet, that means you should have had 399 items imported (you have to subtract the top header line).
a. If you have any less, that means the importer couldn’t import some of the data. Symbols are a good example of something the importer doesn’t understand. So if you have a data sheet with degree, trademark, dollar sign, quotes, etc., those items are ignored. These should have all been filtered and sorted through during the first step. If this does ever happen. Call us, and we will help troubleshoot the issue. This is why we recommend backing up your site, and taking your time before starting this process. It’s much easier to restore the site from your back-up, re-prep your sheet, and try again, than combing through for a mistake after the damage is done. That’s almost like looking for all the split ends on a horse.
14. After a successful import, the next step is creating the product displays! :)