Step 3 - Creating Product Displays Via Importer
This tutorial will go over how to create product displays for a data sheet you might have just imported. These instructions will show you how to create product displays for several products at a time, instead of making them one by one.
1. To create product displays for a whole data sheet, in your admin menu go to “Structure” -> “Feeds importer” -> “Add importer”. You can name it “Product Display Importer” or anything that will help you distinguish that this one is for product displays. Place your description, then click “Create”.
2. Then you’ll go through the same process as you did in Step 2 when you created a new import. These steps will be quick since you should have already gone through these. If you want a more detailed description, open the tutorial for Step 2 and come back after completing point 4.
a. In “Settings” to the right of “Basic Settings”, turn the periodic import off and save.
b. In “Change” to the right of “Fetcher”, select “File upload” and save.
c. In “Change” to the right of “Parser”, select CSV and save.
d. In “Change” to the right of “Processor”, select “Node processor” and click save. It should already be selected by default, but it doesn’t hurt to double check that it is still there.
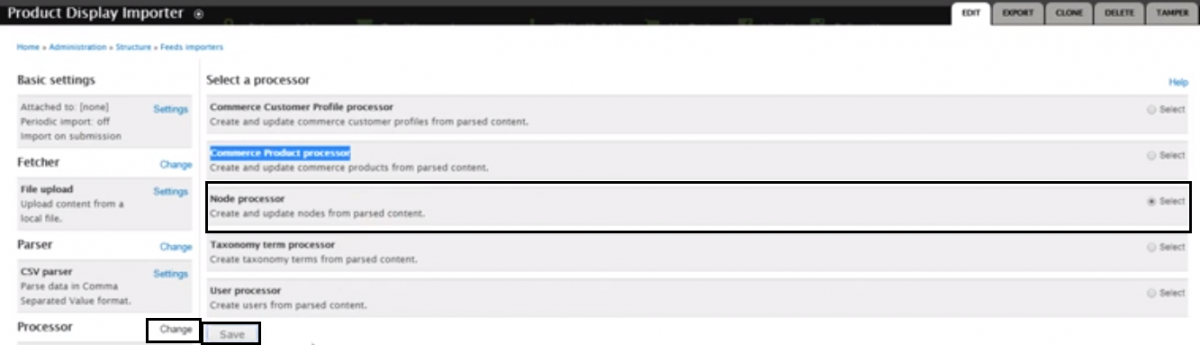
e. In “Settings” to the right of “Node processor”, in the bundle dropdown, select “Product Display”. Then:
i. If you are importing a brand new display, then under “Insert new nodes” keep it selected on “Insert new node”. If you are updating an already existing display then switch it to “Do not…”
ii. If you’re not updating existing nodes, then under “Update existing nodes” keep it selected on “Do not...”
iii. A reminder from step 2, “Skip hash check” is kind of personal preference. If it is selected, it forces an updated of all items, even unchanged ones.
iv. Switch the text format to “Full HTML” just in case.
v. Leave the “Action to take…” on default.
vi. Type and select your username under author, and whoever else you want to give permission to use this importer.
vii. Leave “Expire nodes” under never.
viii. Click save when you all done with these!
3. Now it’s time for the mapping. Click on “Mapping” to the right of “Node processor”, and all you will need to map for the displays are the grouping number, and if you have a data sheet from ASAP, the grouping_title as well for a better overall user experience, and save you some trouble as well.
a. On an ASAP sheet, you’ll be grouping the “grouping” source column to the “Products: SKU (field_products:sku)”, and the grouping_title source column will be mapped to “Title (title)”:

With an ASAP data sheet, your product display import mapping will look like this. Make sure that the grouping_title field is marked as unique:
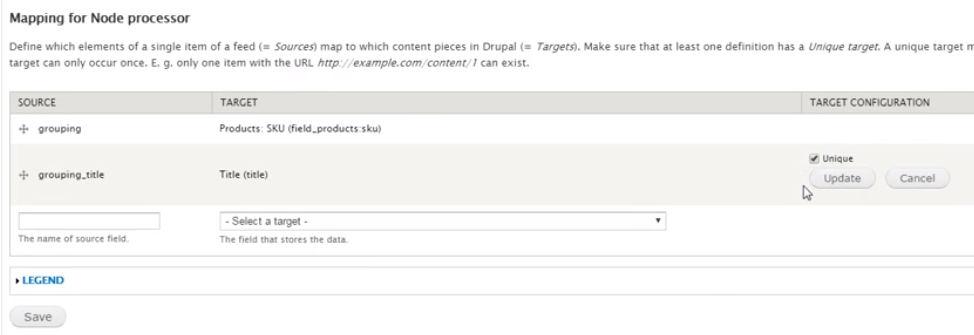
Don’t forget to click Save!
b. If you don’t have an ASAP data sheet, and you want to set up the grouping column, you can use the sort & filter feature in excel to go through them.
i. You’ll want to do a custom sort, and one way is to sort by the title, then determine which items are the same by which ones have the same title. You can have your own method of doing this. As long as you are sure they are variations of the same thing.
ii. If you have items that should be grouped together, first thing to do is insert a new column. It doesn’t matter where the column is.
iii. At this point, it would be a good idea to have a utility like Programmers Notepad handy (regular Notepad should work fine also). Copy the skus from the items on your sheet that you’ve declared should be grouped together, and paste them into a blank page on Programmers Notepad, or even regular Notepad. This is where you’ll add commas after each sku except the last one, like this:

iv. Now you’ll copy your comma separated list, and paste it into the new columns spot of the parent item for the variations.
c. As mentioned in the previous tutorial, it’s probably best to copy/paste the source column titles from the data sheet into the source field on your site. Watch out for those white spaces.
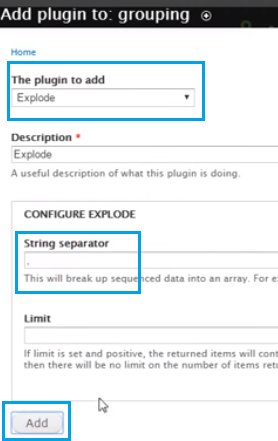
4. Now you’ll move on to the tamper tab. Click on “+ Add plugin” under the sku field. Since there will be multiple skus that are listed in the grouping columns, the plugin to add will be “Explode”, leave string separator as a comma, and click add.
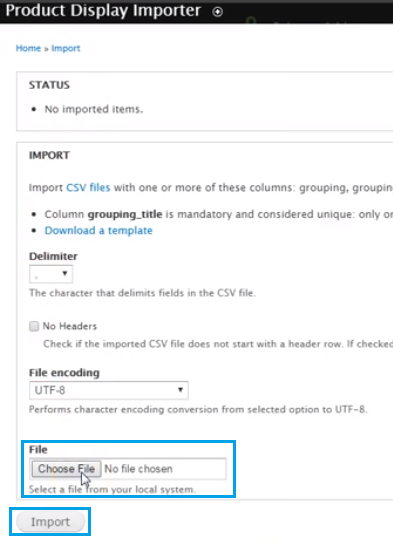
5. When you’re directed back to the tamper page, click save at the bottom, then go back to the “EDIT” tab and click “import".
6. On the next page, select the Product import you just created, choose your file at the bottom, then click “Import”.
7. That’s pretty much all there is to it! If you have any questions, need troubleshooting, anything at all, do not hesitate to call and ask any questions you may have! :)